


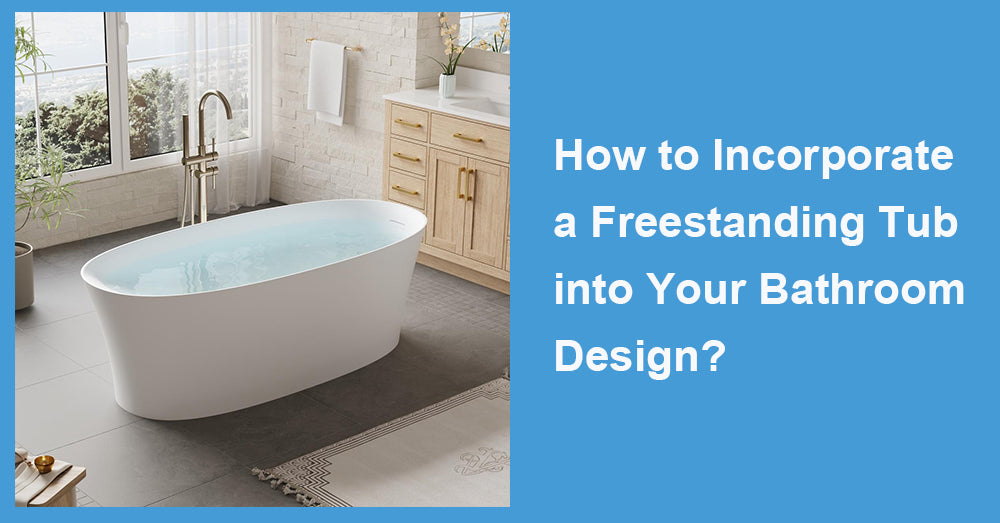
A freestanding tub can become the centerpiece of a bathroom—spa-like, sculptural, and surprisingly practical—if you plan around the realities of space, weight, plumbing, and daily use. The goal isn’t just to “fit the tub.” It’s to create a layout that feels intentional: comfortable circulation, a faucet that doesn’t splash, lighting that flatters the tub’s shape, and finishes that keep the room calm rather than crowded.
1. Start With Space Planning: Give the Tub Room to Breathe
Freestanding tubs look best when they’re not wedged tightly between walls. Even in smaller bathrooms, aim for visual breathing room so the tub reads like a feature—not a forced installation.
A useful planning reference is to ensure a functional access area. Some design guidance notes that code requirements typically call for a minimum access area of 34" wide and 21" deep for a tub area (Source: Pelham & White). Even if your local requirements differ, using this as a baseline helps you avoid cramped clearances that make cleaning and entry awkward.
Practical layout tips
· Centerline thinking: Place the tub so it feels aligned with a window, chandelier/pendant, or a strong wall axis (even if the room is asymmetrical).
· Walkway comfort: Make sure the primary path (door → vanity → shower/tub) is not pinched by the tub edge.
· Cleaning access: Leave enough space to reach behind the tub for mopping and checking connections.
2. Understand Weight: Water + Tub + Person Can Be a Big Load
A freestanding tub can be heavy when filled. Many freestanding tubs hold about 90–100 gallons depending on model (Source: TubSafe; also corroborated by a freestanding tub capacity explanation from Badeloft).
Water weight adds up fast. Engineering Toolbox provides a simple conversion:
Weight of water (lb) = 8.33 × gallons (Source: Engineering Toolbox).
So a 90-gallon fill is roughly 750 lb of water (8.33 × 90 ≈ 749.7 lb), before counting:
· tub weight (varies widely by material),
· bather weight,
· and dynamic loads from stepping in/out.
Most residential floors are commonly designed around a 40 psf uniform live load in building codes (Source: APA technical note). A filled tub creates a concentrated load, not a perfectly uniform one—so if your tub will sit on an upper floor, it’s smart to confirm joist sizing and support, especially for heavier materials.
Design move that avoids regret: if the tub is upstairs or unusually large/heavy, consider a quick consult with a contractor/structural engineer to confirm floor capacity and whether blocking or reinforcement is needed.
3. Check Water Heater and Fill Expectations
Freestanding tubs are often deeper, which means more hot water demand. Typical bathtubs often average 40–60 gallons, while larger freestanding tubs can reach 90–100 gallons (Source: TubSafe).
Two practical questions:
1. How many gallons can you realistically fill with hot water before it cools?
2. How long will it take to fill?
If you’re selecting the faucet too, estimate fill time:
Fill time (minutes) ≈ tub gallons ÷ tub spout flow (gpm)
Even a beautiful tub can become a “rarely used décor piece” if fill time is long or hot water runs out halfway.
4. Choose Placement Based on How You’ll Use the Tub
A freestanding tub can be placed:
· Centered under a window (high-impact, spa vibe—confirm privacy and condensation control)
· In an open corner (often efficient for space, still sculptural)
· As a zone divider in larger baths (tub as the visual anchor between vanity and shower)
Daily-use considerations
· If you bathe frequently, prioritize easy access (don’t force a tight squeeze between tub and vanity).
· If it’s mostly for soaking, prioritize comfort and atmosphere (view, lighting, calm finishes).
5. Plan the Faucet Like a Performance Detail, Not an Accessory
Freestanding tubs typically pair with:
· Freestanding tub fillers (floor-mounted)
· Wall-mounted tub faucets
· Deck-mounted faucets (less common unless the tub sits by a built structure)
Good placement reduces splashing and keeps controls reachable. A practical guideline from a freestanding tub buyer’s guide suggests leaving about 5 inches between the faucet outlet and the tub rim for minimal splashing and visual balance, and placing wall-mounted faucets roughly 3–5 inches above the rim (Source: Better Homes & Gardens).
Design checklist
· Confirm spout reach lands the stream inside the basin (not on the rim or near the outer wall).
· Ensure the filler height matches the tub rim height.
· Keep controls reachable from inside the tub if you plan to adjust temperature while soaking.
6. Pick Materials That Match Your Lifestyle
Freestanding tubs come in acrylic, solid surface, cast iron, stone resin, and more. The material affects:
· Weight (structural implications),
· heat retention (how long the soak stays warm),
· cleaning (surface maintenance),
· and sound (some materials feel quieter and more “luxury”).
Acrylic tends to be lighter and easier to install; cast iron and stone-like materials can feel more substantial but are heavier and may demand more planning (Source: Better Homes & Gardens’ discussion of tub weight considerations).
7. Use Lighting and Surrounding Finishes to Create “Spa” Instead of “Showroom”
A freestanding tub looks best when the bathroom lighting is layered:
· Ambient light (general)
· Task light (vanity)
· Accent light (tub zone)
Accent ideas that feel upscale:
· a dimmable pendant centered over the tub (if ceiling height allows),
· wall washers or soft sconces on the tub wall,
· a warm, low-glare scene for evening soaks.
For finishes, the tub should “read” as a focal point. Keep the surrounding palette calmer:
· fewer competing tile patterns,
· coherent metal finishes (faucet + hardware),
· and one or two strong textures (stone, wood, micro-cement look).
8. Think About Resale Value Without Designing for Resale Only
Bathrooms are high-impact spaces in renovation value discussions. The 2025 Cost vs. Value report lists a midrange bath remodel with about 80% cost recouped in its published summary (Source: JLC 2025 Cost vs. Value Report).
A freestanding tub can support that “wow” factor when it’s integrated thoughtfully—good layout, strong lighting, coherent finishes—rather than installed as a cramped statement.
9. A Simple Step-by-Step Plan
1. Measure the room and map clearances (use the 34" × 21" access idea as a baseline comfort check).
2. Choose tub size by space and use, not just aesthetics.
3. Estimate weight using capacity (90–100 gallons is common for freestanding) and water weight (8.33 lb/gal).
4. Confirm floor support—especially upstairs (40 psf live load is a common code baseline, but tubs concentrate load).
5. Plan hot water and fill time.
6. Select faucet type and placement to reduce splash and improve usability.
7. Design the tub zone with calm finishes and layered lighting.

Conclusion
Incorporating a freestanding tub successfully is about balancing beauty with physics and routine: enough space to feel intentional, enough structural support for real weight, enough hot water for the soak you want, and a faucet/lighting plan that makes the tub easy and inviting to use. When those fundamentals are solved, the tub doesn’t just look luxurious—it becomes the part of the bathroom that genuinely feels like a retreat.


Leave a comment
This site is protected by hCaptcha and the hCaptcha Privacy Policy and Terms of Service apply.