


In current American home decor, especially in bathroom upgrades and renovations, a curved shower rod is a popular option. It not only increases the usable space in the shower area and improves the shower experience, but also meets current consumer demand for aesthetics, practicality, and DIY (do-it-yourself) installation. According to the latest market research, the global (including the United States) shower curtain rod and ring market is estimated at approximately $500 million in 2025. It is expected to grow at a compound annual rate of roughly 5% between 2025 and 2033 (source: Turn0search7). These data indicate that the bathroom, as an essential element for home upgrades, and the curved shower bar, as a relatively economical yet significantly improved accessory, warrant attention in terms of market demand.
Below, we will provide a detailed analysis across several dimensions, including market background, purchase points, the detailed installation process, common problems, and maintenance suggestions.
1. Market background and why choose curved shower bars
Firstly, from market data, although the "shower bar" as a single hardware accessory is not the most expensive project, its market size is stable and has growth potential. For example, the analysis of shower curtain rods and rings points out that there is an increasing demand for functional and aesthetically pleasing shower rods in global households and commercial scenarios, with "curved rods," "telescopic rods," and "wall-mounted models" becoming the focus of consumer attention (source: Turn0search2).
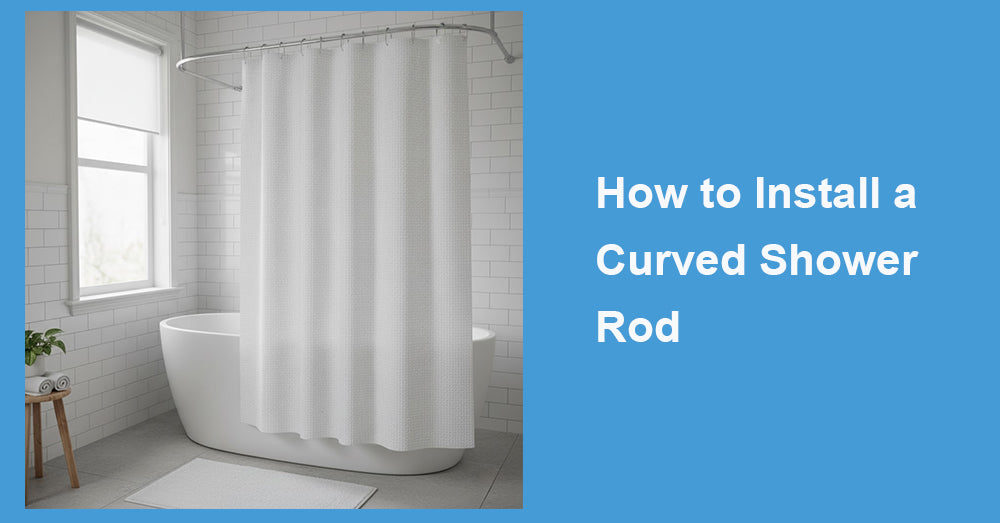
Secondly, bathroom renovations have become a key area of residential renovation. Both aging houses and bathroom layouts need to be optimized, as well as new residential buildings that aim for a more spacious, comfortable shower experience. Compared to traditional straight shower bars, the curved bar design bends outward slightly, allowing the shower curtain or glass partition to be farther from the body, thereby providing a more spacious activity space and a less intimate feeling. For tall users, those with a larger body size, or those looking to improve shower comfort, this design is beautiful. Its advantages include: enhancing visual and usable space, reducing the sense of closeness, reducing the range of splashed water vapor, and creating a more modern overall design.
2. Key factors for choosing a curved shower bar
When making a purchase, American users and contractors usually pay attention to the following key dimensions:
1. Material and anti-corrosion performance
The bathroom environment is high-humidity, and steam, hot water, and even salt spray in island areas may accelerate the corrosion of metal components. Therefore, preferred materials include stainless steel, stainless chrome-plated steel, brass coating, and rust-resistant aluminum alloy. Some low-priced products may use ordinary steel, which is prone to rust, corrosion, and discoloration. It is recommended to pay attention to whether the packaging or product description indicates "rust resistance finish" or "corrosion resistance", etc.
2. Match size and curvature
Although the length (horizontal span) of the shower bar depends on the distance between the walls on both sides of the shower or bathtub, the "outward curvature" of the curved bar also needs to be considered. In typical American households, the standard wall width for a bathtub and shower is about 60 inches (five feet), so the applicable curved rod length can be a telescopic type measuring 55 to 72 inches. For more expansive or open shower areas, 72 to 78 inches, or larger, may be chosen. As for the "protruding curvature" (i.e., the part where the rod bends outward), the standard range is 4 to 6 inches, to allow users to stay away from the curtain wall during showering and feel more spacious. Before installation, the wall spacing, placement of shower curtains/glass partitions, and user habits (such as frequent use of handrails, washbasins, etc.) should be measured.
3. Fixed method and installation type
Curved rods can be divided into wall-mounted fixed type, tension rod type, or rail sliding type. Wall-mounted. A wall-mounted, fixed type is usually more stable and suitable for households that use it frequently; the push type is ideal for renting residential properties and temporary installations, but its stability is poor. Sliding type (i.e., with track rails on the pole to allow the curtain to slide) is more common when pursuing high-end experiences. For DIY users, it is recommended to choose models with wall brackets, screw expansion tubes, clear instructions, and complete accessories.

3. Installation guide: How to install a curved shower bar by yourself
The following is a typical installation process for a wall-mounted, fixed, curved shower bar, suitable for home users with some hands-on ability. Please confirm that the tools are complete and that the wall structure is ideal for fixing (e.g., concrete walls or bolted connections) before operation.
Step 1: Measurement and Marking
Measure the horizontal distance between the two walls first (assuming 60 inches).
Determine height: Typically, the upper end of the pole is located approximately 72-78 inches from the ground.
After determining the fixing points of the brackets on both sides, use a level ruler to ensure that the two support points are on the same horizontal line.
Mark the drilling points. It is recommended that the hole spacing be slightly shorter than the pole's length on both sides to ensure a reserve after the pole expands and contracts.
Step 2: Drilling and Installing a Wall-Mounted Bracket
Use a drill bit that matches the size of the expansion tube to drill holes at the marked locations.
Insert plastic expansion tubing or metal anchor bolts to prevent screws from loosening.
Fix the bracket and pre-tighten the screws, but do not fully reinforce it for future horizontal adjustment.
Step 3: Install the main body of the curved rod
Insert one end of the rod into the bracket's fixed position, and adjust the other end to the bracket on the other side.
If it is a telescopic rod, extend it to the appropriate length and lock the collar.
Ensure the pole is stable and there is no significant shaking.
Step 4: Adjust the level and reinforce
Use a spirit level to confirm whether the pole is level again. If it is uneven, loosen the bracket for fine adjustment.
Cross confirm that the central curved part of the pole is in the appropriate "outward convex" position (usually 4-6 inch arc).
Fully fix the screws on both sides of the bracket.
Step 5: Hanging curtains and trial operation
Hang the shower curtain on the pole and confirm whether it covers the bathtub or the shower room when unfolded.
Test whether the curtain slides smoothly and whether there is any obstruction.
Test the water or steam condition in shower mode and observe whether the rod is affected by humidity or shaking.
Safety and Precautions
If the wall is made of gypsum board or hollow wall, it is recommended to use specialized expansion bolts or wall-mounted anchor bolts.
Avoid fixing the rod in gaps between ceramic tiles, as these are prone to moisture damage.
Some shower rods feature heavy ends. If the rod body sinks or the bracket is deformed after installation, it should be adjusted or replaced with a larger bracket immediately.
If children or elderly people use the bathroom, it is recommended to choose thicker rods and reinforced brackets to enhance safety and stability.
5. Summary and Suggestions
For consumers or home decor contractors, curved shower bars are a cost-effective choice that enhances the experience with minimal investment. When making a purchase, attention should be paid to the material, anti-corrosion performance, size and curvature matching, bracket fixing method, style matching, and brand after-sales service. Although the installation process is not complicated, precise measurements, bracket installation, and level confirmation are particularly crucial. For DIY users, strictly following the above steps can provide a stable, comfortable, and reliable shower bar installation experience.


Leave a comment
This site is protected by hCaptcha and the hCaptcha Privacy Policy and Terms of Service apply.